
By myringsizecalculator.com · Updated 2026 · 10 min read
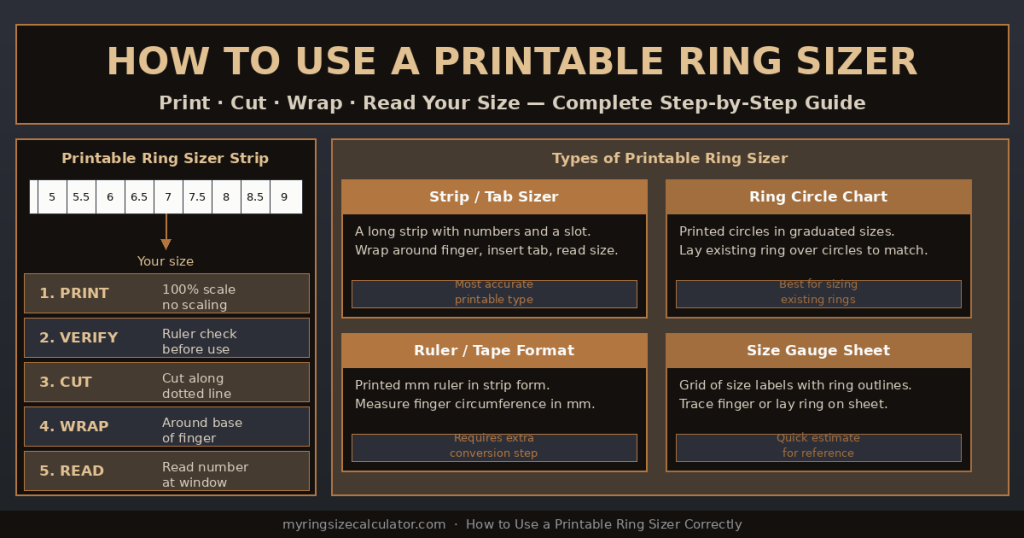
Four types of printable ring sizer and how each one works — strip/tab, ring circle chart, ruler format, and size gauge sheet.
| ⚡ Quick Answer: How to Use a Printable Ring Sizer 1. Download and print the ring sizer at 100% scale (Actual Size — never Fit to Page).2. Verify scale: the printout includes a test ruler — check it against a physical mm ruler before using.3. Cut along the dotted line to produce the sizer strip.4. Thread the pointed tab through the rectangular slot to form a loop.5. Slide the loop over the base of your finger and pull snug — not tight.6. Read the size number showing at the alignment window or slot. That is your ring size.7. If between two sizes, always choose the larger one. |
1. What Is a Printable Ring Sizer?
A printable ring sizer is a paper tool that you download, print, and use at home to measure your finger and determine your ring size. It provides the functionality of a professional ring sizer — the linked plastic gauges sold in jewellery stores — in a format that anyone can produce at home with a standard inkjet or laser printer.
The key difference between a printable ring sizer and any other home measurement method is accuracy: when printed at 100% scale, a good printable ring sizer eliminates the measurement step entirely. Rather than measuring a length in mm and looking up a chart, the printable sizer reads your size directly from the tool — the size number is printed on the strip or chart.
When a Printable Ring Sizer Is Most Useful
- Buying a ring online: most online jewellery retailers provide a printable ring sizer download on their sizing help page.
- Sizing for a surprise gift: you can print and use it on the recipient without them knowing the full purchase is being planned.
- No access to a jeweller: the printable sizer provides professional-grade accuracy at home for free.
- Verifying an existing ring size: a printable circle chart allows you to check the size of a ring you already own.
Related: How to Read a Ring Sizer (Mandrel & Loop Guide) | How to Measure Ring Size at Home
2. Types of Printable Ring Sizer
There are four main formats of printable ring sizer, each with different use cases and accuracy levels.
| Type | How It Works | Best Accuracy | Best For |
| Strip / Tab Sizer | Printed strip with slot and tab — wraps around finger like a plastic sizer | ~92–95% | Measuring a living finger directly |
| Ring Circle Chart | Graduated circles printed at actual size — overlay existing ring | ~91–94% | Finding size of an existing ring |
| Ruler / Tape Format | Printed mm ruler strip — measure circumference in mm, convert | ~88–92% | Extra verification step after strip method |
| Size Gauge Sheet | Grid of ring outlines at actual sizes — trace or overlay finger | ~80–88% | Quick visual estimate, not primary method |
3. How to Use a Printable Ring Sizer Strip: 7-Step Guide
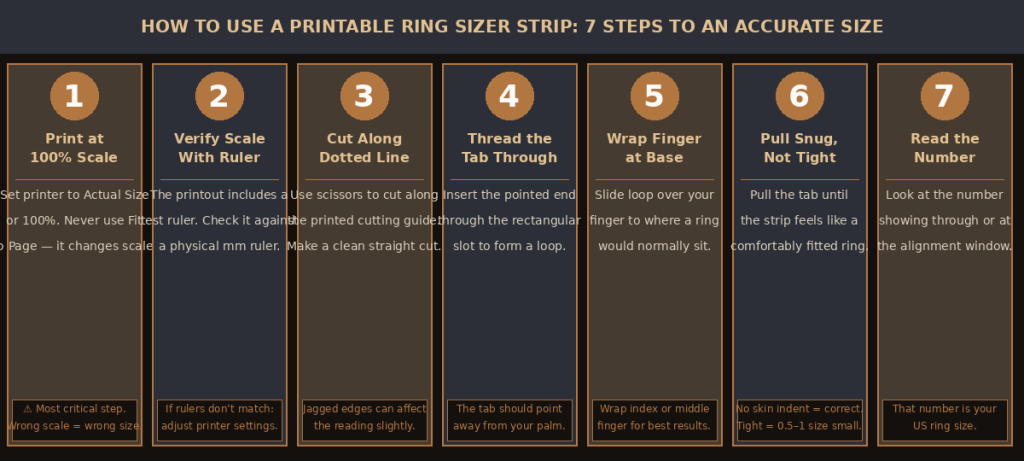
Seven steps to correctly use a printable ring sizer strip — from printing to reading your final ring size.
The printable ring sizer strip (also called a tab sizer or loop sizer) is the most accurate type of printable ring sizer for directly measuring a living finger. It works identically to the linked plastic ring gauges used in jewellery stores, but printed on paper.
Step 1: Download and Open the PDF
Download the printable ring sizer PDF from a reputable source. Always open the PDF using your device’s native PDF viewer (Adobe Acrobat, Preview on Mac, or Edge/Chrome built-in PDF viewer). Avoid opening it in browser preview modes that may automatically scale the document.
Step 2: Set Print Settings to 100% Scale
This is the single most important step. In your printer’s print dialog:
- Set Page Scaling to: None, Actual Size, or 100%.
- NEVER select ‘Fit to Page’, ‘Shrink to Fit’, or ‘Fit Printable Area’ — these all change the scale of the sizer and make it inaccurate.
- Set page margins to zero or the minimum allowed by your printer (known as ‘borderless printing’ or ‘no margins’).
- Use any paper size (letter or A4) — both will work as long as scaling is 100%.
| ⚠️ The Scale Warning: This Is the Number One Error If you print a ring sizer at 90% scale (a common default), every size marking will be off. At 90% scale, a finger that is actually Size 7 will read as Size 5.5 or 6 — almost 1.5 sizes too small. Always verify scale before relying on any printable ring sizer. |
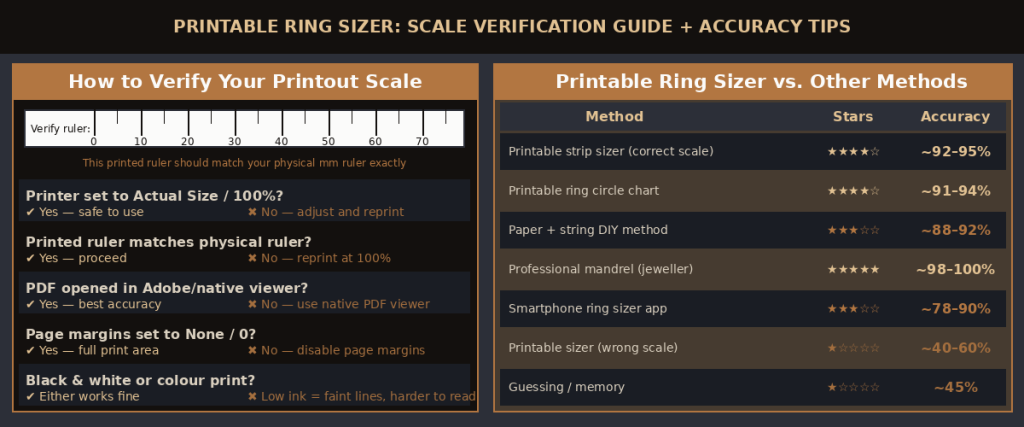
Step 3: Verify Scale After Printing
Most professional printable ring sizers include a test ruler — a printed ruler showing mm or inch markings. After printing, place a physical ruler alongside the printed ruler. They should match exactly. If the printed ruler is even 1mm longer or shorter than your physical ruler, your print scale is off and you must reprint.
Step 4: Cut Out the Sizer Strip
Using scissors, cut along the dotted or solid cut line printed on the strip. Make a clean, straight cut. Jagged or angled cuts create a misaligned tab that slightly affects the reading. Some printable sizers are best cut with a craft knife against a ruler for maximum precision.
Step 5: Thread the Tab
Insert the pointed narrower end of the strip through the small rectangular slot printed on the other end. This creates a loop. The numbers on the strip should face outward (away from your skin) with the slot on top of your finger.
Step 6: Wrap Around Your Finger
Slide the loop over the base of your target finger — the index or middle finger of the hand that will wear the ring. The loop should sit where a ring would normally rest during daily wear, not over the knuckle.
Step 7: Pull Snug and Read
Pull the pointed tab through the slot until the loop feels snug around your finger. Snug means: similar to how a well-fitted ring feels — contact with your skin without compressing it. Read the size number visible in or at the alignment window. That number is your ring size.
| 💡 Too Tight vs. Snug: The Critical Distinction Pulling the printable ring sizer too tight is the second most common error (after wrong print scale). A strip pulled tight enough to leave an indentation or cut off circulation gives a reading that is 0.5 to 1 full size too small. The correct tension: the strip should slide off your finger when you pull it, but with some resistance — not freely. |
4. The Most Critical Step: Printing at the Correct Scale
Scale verification checklist for printable ring sizers, and accuracy comparison across all common sizing methods.
Scale accuracy is the defining factor between a printable ring sizer that works and one that gives a completely wrong result. Here is a complete guide to verifying and correcting print scale.
How to Check Print Scale on Windows
- Open the PDF in Adobe Acrobat Reader or Microsoft Edge.
- Press Ctrl+P to open the print dialog.
- Under Page Sizing & Handling, select Actual Size (Acrobat) or Page Setup: None (Edge).
- Uncheck ‘Choose paper source by PDF page size’ if shown.
- Click Print, then verify the ruler on the printout against a physical ruler.
How to Check Print Scale on Mac
- Open the PDF in Preview.
- Press Cmd+P to open the print dialog.
- Set Scale to 100%.
- Ensure no auto-rotation is applied.
- Print and verify the ruler.
How to Check Print Scale on Mobile / Tablet
Printing PDFs from smartphones and tablets often introduces unwanted scaling. For best results, email the PDF to a desktop or laptop computer and print from there. If printing from mobile is the only option, use a dedicated PDF app (Adobe Acrobat Mobile) and select Actual Size or 100% in print settings before confirming.
Scale Verification Using Known Object Sizes
If your printable sizer does not include a test ruler, you can verify scale using the credit card trick: most printable ring sizers include a printed credit card outline at actual size. A real credit card is exactly 85.6mm × 54mm. If the printed outline does not match your actual credit card exactly, your print scale is wrong.
5. How to Use a Printable Ring Size Chart (Circle Method)

The printable ring circle chart is a different format from the strip sizer. Instead of measuring your finger directly, it shows graduated circles at actual printed size, allowing you to match an existing ring to the circle that fits it most accurately.
How to Use the Circle Chart
- Print the circle chart at 100% scale and verify against the included ruler or credit card outline.
- Place an existing ring — one that fits well on the target finger — face-down on the chart.
- Find the circle where the ring’s inner edge sits just inside the circle’s border. The ring should not overlap the circle, and the gap should be minimal.
- The size number printed inside or beside that circle is your ring size.
- If the ring sits between two circles (inner edge falls between two sizes), choose the larger circle’s size.
| 🔴 Circle Chart: Use Only with a Ring from the Same Finger The printable circle chart only gives the size of the ring you are measuring — not the size of your finger directly. A ring from your right ring finger cannot size your left index finger. The reference ring and the new ring must both be worn on the same finger, same hand. If you do not have a ring from the correct finger, use the strip sizer method instead. |
6. How to Use a Printable Ring Size Tape Measure
Some printable ring sizers come in a ruler or tape measure format — a strip printed with mm markings that you use to measure your finger’s circumference directly, then convert using a ring size chart.
Using the Printable Tape Measure
- Print at 100% scale and verify accuracy against a physical ruler.
- Cut out the printed tape measure strip.
- Wrap around the base of your target finger with the mm scale facing outward.
- Read the mm number at the point where the strip completes the loop.
- Use the ring size chart below to convert your circumference in mm to a US ring size.
This format is slightly less convenient than the tab strip (which reads size directly) but is useful for confirming measurements and for people who prefer to verify the circumference number against multiple charts.
| ▶ Video: How to Use a Printable Ring Sizer — Full Demonstration (YouTube) Watch a hands-on demonstration of how to print, cut, use, and read a printable ring sizer strip — including how to verify print scale and avoid the most common mistakes.Recommended searches: ‘how to use printable ring sizer’ · ‘printable ring sizer strip tutorial’ · ‘print ring size at home’ |
7. How to Read a Printable Ring Sizer Result
Reading the result depends on which type of printable ring sizer you are using.
Reading a Strip / Tab Sizer
When you have pulled the tab through the slot to a snug fit on your finger, look for:
- Number at the slot: some strip sizers show the size number where the tab emerges from the slot. Read this number.
- Number at an alignment window: some strips have a small window punched through which a number is visible. Read the number showing through the window.
- Closest marking to the edge: some simpler strips print size numbers along the tab. The number closest to the slot edge is your size.
Reading a Circle Chart
The circle that fits your ring most precisely — with the ring’s inner edge sitting just inside the printed circle border with minimal gap — indicates your size. The size number is printed beside or inside the circle.
What to Do When Between Two Sizes
Whether you are using a strip sizer or a circle chart, if your result falls between two sizes, always choose the larger one. A ring that is half a size too large can be worn with a ring size adjuster. A ring that is half a size too small may not be wearable and could require expensive resizing.
| Situation | What to Do |
| Reading falls exactly on a number | Order that size — straightforward |
| Reading falls between two numbers | Order the LARGER size |
| Finger swollen (evening/activity) | Use evening reading — this is your size |
| Two readings differ by 0.5 size | Use the larger reading |
| Two readings differ by 1+ size | Re-measure; check print scale first |
8. Printable Ring Sizer Accuracy — How Reliable Is It?
A correctly printed and correctly used printable ring sizer strip achieves approximately 92–95% accuracy — comparable to the linked plastic ring gauge sets used in jewellery stores. The limitation is not the tool itself but the two main sources of user error: incorrect print scale and pulling the strip too tight.
Factors That Affect Printable Sizer Accuracy
| Factor | Effect on Accuracy | Prevention |
| Print scale not at 100% | Off by 0.5–2 full sizes | Always verify with ruler after printing |
| Strip pulled too tight | Reads 0.5–1 size too small | Snug contact only — no skin indent |
| Measured in the morning | Fingers smaller — may be 0.5 too small | Measure in the evening |
| Wrong finger measured | Off by 1–2 full sizes | Measure the ring-wearing finger only |
| Paper stretched during use | Slightly smaller reading | Use heavier paper stock or laminate |
| Band width ignored | Wide ring feels too tight | Add 0.5 size for bands 6mm+ wide |
9. Common Printable Ring Sizer Mistakes
These are the errors that lead to wrong sizes when using a printable ring sizer.
- Printing with ‘Fit to Page’ selected: the single most common error. Always use Actual Size or 100%.
- Not verifying scale after printing: the test ruler exists for this purpose — always check it before using the sizer.
- Pulling the tab too tight: gives a reading 0.5–1 size too small. Practice snug vs. tight on your wrist first.
- Using the circle chart to size a finger directly: the circle chart is for existing rings only, not for measuring a living finger.
- Measuring on the wrong finger or hand: each finger is a different size. Dominant hand fingers are typically 0.5 sizes larger.
- Only measuring once: measure 2–3 times across the day; use the largest result.
- Ignoring knuckle size: if your knuckle is larger than your finger base, the ring must pass the knuckle. Size for the knuckle.
- Using a browser print preview: browser scaling often does not respect 100% settings. Use a native PDF viewer.
10. Online Ring Sizer Tools vs. Printable Sizers
In addition to printable sizers, several websites and apps offer virtual or online ring sizer tools that use your device’s screen to estimate ring size. Here is how they compare.
| Aspect | Printable Ring Sizer | Online / Virtual Ring Sizer |
| Accuracy | ~92–95% when printed correctly | ~78–90% depending on calibration |
| Cost | Free — just print and cut | Free — web or app based |
| Equipment needed | Printer + paper | Smartphone or computer with screen |
| Scale dependency | Critical — must be 100% | Screen calibration must be correct |
| Can measure live finger? | Yes — strip method | Varies — some can, some can’t |
| Can size existing ring? | Yes — circle chart method | Yes — hold ring to screen |
| Offline use | Yes — once printed | No — requires internet connection |
| Best use case | Any home sizing situation | Quick check when no printer available |
Alternative methods: How to Check Ring Size Without a Tape Measure | How to Know Your Finger Ring Size
11. Frequently Asked Questions
Q: How do you use a printable ring sizer?
A: Print at 100% scale, verify scale with the test ruler, cut out the strip, thread the tab through the slot to form a loop, slide over the base of your target finger, pull snug (not tight), and read the size number showing at the alignment window or slot. If between two sizes, choose the larger one.
Q: How do you print off a ring sizer?
A: Download the ring sizer PDF. Open it in a native PDF viewer (Adobe Acrobat, Preview, or Edge). Press Print, set Page Scaling to Actual Size or 100%, ensure margins are at zero or minimum. Print. Verify the test ruler on the printout matches a physical ruler before using. If the rulers do not match, reprint with corrected settings.
Q: What are printable ring sizers and how accurate are they?
A: Printable ring sizers are paper tools you download, print, and use at home to measure your finger size. When printed at 100% scale and used correctly, they achieve approximately 92–95% accuracy — comparable to the linked plastic ring gauges in jewellery stores. The main accuracy risk is incorrect print scale, which can make the result off by 1–2 full sizes.
Q: How do you use a printable ring sizer strip?
A: Cut out the printed strip. Thread the pointed end through the rectangular slot. Slide the loop over the base of your target finger. Pull the tab until the strip feels like a snug (not tight) ring on your finger. Read the number showing at the alignment window or slot. That is your US ring size.
Q: Where can I find a free printable ring sizer?
A: Most online jewellery retailers offer free downloadable ring sizer PDFs on their size guide or help pages. General jewellery resources including the GIA and major chains such as Tiffany, James Allen, and Blue Nile publish free printable ring sizers. Search ‘free printable ring sizer PDF’ and download from a reputable retailer’s official website.
Q: How do I use an online printable ring sizer?
A: An online ring sizer tool uses your screen: visit the website, calibrate your screen using the credit card method (hold a real credit card against the card image on screen until they match), then either hold an existing ring to the screen circle chart to find the matching size, or follow the on-screen instructions to measure your finger using the webcam or on-screen guide.
Q: What is a printable ring sizer strip and how does it work?
A: A printable ring sizer strip is a paper version of the flexible plastic loop ring gauges used in jewellery stores. It consists of a long strip with numbered size markings and a slot at one end. After printing and cutting, you thread the strip through the slot to form a loop, wrap it around your finger, and pull to a snug fit. The number showing at the slot or window is your ring size.
Q: How do you use a printable ring sizer for ring size?
A: Print at 100% scale, verify with the test ruler, cut the strip, thread the tab to form a loop, wrap at the base of your finger, pull snug, read the number. Apply band width adjustment if the ring you are ordering is wider than 6mm (add 0.5 to the reading). Measure in the evening for the most accurate daily reading.
Q: Is a printable ring sizer accurate?
A: Yes — when printed at 100% scale and used with correct tension. A correctly used printable ring sizer strip achieves 92–95% accuracy. The two main sources of error are: printing at the wrong scale (use Actual Size, not Fit to Page) and pulling the strip too tight (snug only, no skin indent). A professional mandrel at a jeweller is the only more accurate option and is always free.
Q: Can I use a ring sizer printable without scissors?
A: The printable ring sizer strip works best with a clean cut. Without scissors, you can tear along a straight edge (a ruler or book edge) for a reasonably straight line. However, a clean straight cut is important for the tab to thread through the slot correctly — a jagged or diagonal tear may make the strip difficult to use and slightly less accurate.
More Ring Sizing Resources
On this site: How to Read a Ring Sizer (Mandrel & Loop) | How to Measure Ring Size at Home | How to Use a Ring Size Chart | Oura Ring Sizing Hub
External: GIA: Ring Size Guide | Wikipedia: Ring Size | Reddit: r/jewelers — Printable Sizer Tips | BBC: Buying Jewellery Online
| 💰 Accuracy Note Printable ring sizers achieve 92–95% accuracy when printed at 100% scale and used correctly. For rings over $200, always verify your size at a jewellery store using a professional mandrel. Most stores offer free sizing in under 60 seconds with no purchase required. |