
By myringsizecalculator.com · Updated 2026 · 8 min read
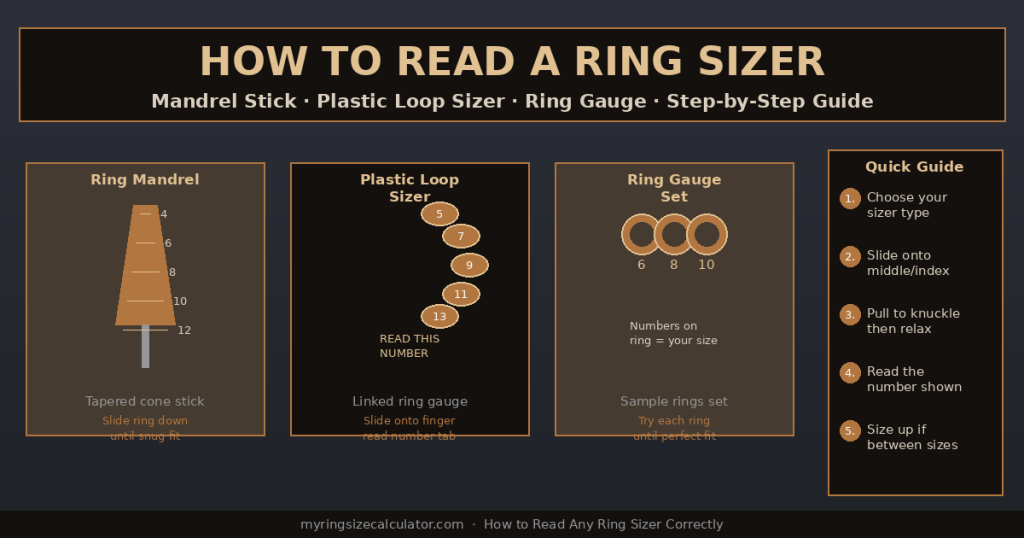
The three main types of ring sizer: ring mandrel (cone stick), plastic loop gauge, and sample ring set — and how to read each one accurately.
| ⚡ Quick Answer: How Do You Read a Ring Sizer? To read a ring sizer stick (mandrel): slide your existing ring down the tapered cone until it stops naturally, then read the number marked at the ring’s lower inner edge. That number is your ring size.To read a plastic loop ring sizer: slide the pointed tab through the loop, wrap around your finger, pull snug (not tight), and read the number on the tab visible through the window. That is your ring size.Always measure at the end of the day when fingers are slightly swollen. If between sizes, choose the larger one. |
1. What Is a Ring Sizer and How Does It Work?
A ring sizer is a measuring tool used to determine the correct ring size for a finger. Ring sizes in the United States are expressed as numbers (typically 4 through 13 for adults), with each number corresponding to a specific finger circumference in millimetres. The tool translates your finger’s physical measurement into this standardised number system.
There are three main types of ring sizer, each read slightly differently:
- Ring mandrel (ring sizer stick): a tapered cone-shaped rod, usually metal or plastic, with size numbers printed along its length. You slide a ring down the mandrel until it stops and read the number at the ring’s position.
- Plastic loop ring sizer: a linked set of plastic rings attached to a central ring, sometimes called a finger gauge. You try each ring on your finger until you find the snuggest comfortable fit. Alternatively, a single plastic strip with a locking tab reads directly off your finger.
- Sample ring set (ring gauge): a set of actual metal or plastic rings in standard sizes. You try each one and the ring that fits best indicates your size.
Each type of ring sizer follows the same underlying principle: matching the circumference of your finger to a standardised number. The difference is in how the measurement is taken and displayed.
Related: How to Find Your Oura Ring Size | Wikipedia: Ring Size
2. How to Read a Ring Mandrel (Ring Sizer Stick)
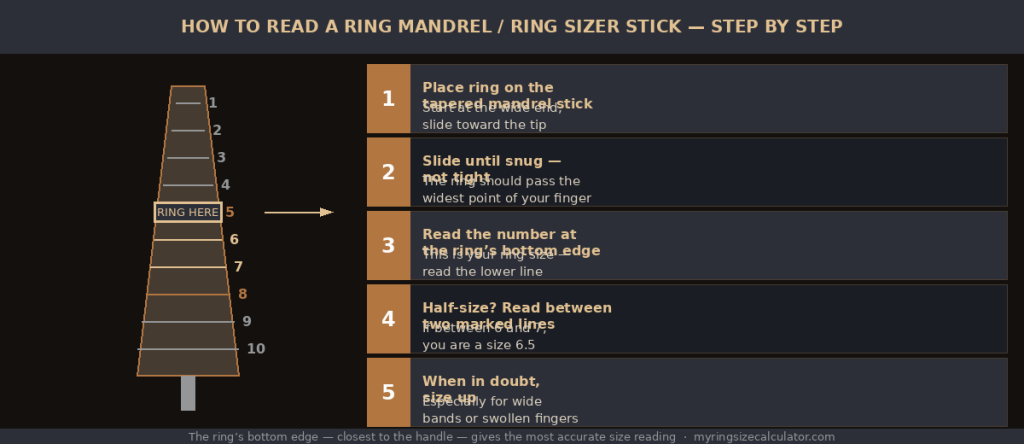
Five steps to correctly read a ring mandrel — where to place the ring and which number to read.
A ring mandrel (also called a ring sizer stick or ring sizing mandrel) is a tapered rod with ring size numbers engraved or printed along its length. It is the most precise type of ring sizer available for determining size from an existing ring. Jewellers use professional steel mandrels; consumer versions are commonly plastic or aluminium.
Step-by-Step: How to Read a Ring Mandrel
- Hold the mandrel vertically with the wide end at the top and the pointed/handle end at the bottom.
- Take the ring you want to size and slide it down from the wide top end toward the narrower bottom.
- Let the ring slide down naturally until it stops due to friction — do not force it.
- Look at where the ring sits on the mandrel. Read the number at the ring’s lower inner edge (the edge closest to the handle, not the top).
- That number is your ring size. If the ring sits between two numbers, round up to the next half or whole size.
| 📏 Which Edge to Read on a Ring Mandrel Always read the number at the BOTTOM edge of the ring (closest to the tapered tip / handle end). This bottom edge indicates the size that the ring would comfortably slide over a finger. Reading the TOP edge gives a smaller, incorrect number. The lower edge reading is your accurate ring size. |
Reading Half Sizes on a Ring Mandrel
Many ring mandrels mark only whole sizes (6, 7, 8, etc.). If your ring sits exactly halfway between two whole-size markings, your size is the half-size between them — for example, 7.5 if the ring sits between the 7 and 8 markings. Some mandrels include half-size markings; on those, simply read whichever line the ring’s lower edge aligns with most closely.
Reading a Ring Mandrel for Different Ring Widths
Wider rings sit higher on a mandrel than narrower rings at the same actual size. This is because a wider band requires more knuckle clearance. When reading a mandrel for a wide ring (more than 6mm wide), add half a size to the reading to account for this. For standard-width rings (2–4 mm), read the mandrel number directly.
| Ring Width | Mandrel Reading Adjustment |
| Under 3 mm | Read number directly — no adjustment needed |
| 3–6 mm | Read directly, adjust by +0.25 size if comfort is borderline |
| 6–10 mm | Add +0.5 size to the mandrel reading |
| Over 10 mm | Add +0.5 to +1.0 size to the mandrel reading |
Further reading: GIA Ring Size Chart | Wikipedia: Ring Size
3. How to Use and Read a Plastic Loop Ring Sizer
A plastic loop ring sizer (also called a finger gauge, ring gauge, or ring size measurer) is the most common type sold in jewellery stores and online. It consists of either a series of linked plastic rings or a single adjustable strip with a tab and measurement window. Both versions are read differently.
Type A: Linked Ring Set (Try-On Method)
This type of plastic ring sizer consists of multiple small rings attached together, each labelled with a different size. To use it:
- Separate the rings — they are usually clipped together but can pivot apart.
- Try the ring labelled with your estimated size on your target finger (index or middle finger of your dominant hand).
- The ring should slide over your knuckle with light-to-moderate resistance and sit snugly at the base — not rotating freely, but not tight.
- If it slides too easily, try the next smaller size. If it will not pass the knuckle, try the next larger size.
- The size on the ring that fits best is your ring size.
Type B: Adjustable Strip Sizer (Read the Number Method)
This is the most common consumer ring sizer type and what most people mean when they say ‘how to use a ring sizer.’ It looks like a small plastic buckle strip:
- Insert the pointed tapered end of the strip through the rectangular slot to form a loop.
- Slide the loop over your finger to the base (where you would wear a ring).
- Pull the tapered end through the slot until the loop feels snug — it should not indent your skin or rotate freely.
- Look at the number showing through the window or alignment slot on the gauge. That number is your ring size.
- If the number falls between two marked sizes, choose the larger one.
| ⚠️ Common Mistake: Pulling the Plastic Sizer Too Tight The most frequent error with plastic loop ring sizers is pulling the strip too tight — so snug that it feels similar to a tourniquet. This gives a reading that is 0.5 to 1 full size too small. The correct tension is ‘snug without indenting’ — the strip should sit against the skin with a very light compression, similar to how a well-fitted ring sits. You should be able to slide the sizer off with mild resistance. |
4. How to Use a Ring Gauge / Sample Ring Set

A ring gauge or sample ring set is the most intuitive type of ring sizer — you simply try actual ring-sized samples on your finger until you find the one that fits correctly. This is the method used by most high-street jewellers for in-person sizing.
How to Use a Sample Ring Set
- Identify which finger and which hand you plan to wear the final ring on. Dominant hand fingers are typically 0.5 sizes larger than the non-dominant hand.
- Start with the ring closest to your estimated size based on a previous measurement or general knowledge.
- Slide the sample ring over the knuckle of your target finger. It should pass the knuckle with light resistance.
- Once past the knuckle, the ring should sit snugly at the base without rotating when you shake your hand gently.
- If the ring will not pass the knuckle without significant force, try the next size up.
- If the ring slides over the knuckle and then rotates freely at the base, try the next size down.
- The sample ring that passes the knuckle easily and sits snugly at the base without rotating is your ring size.
The Knuckle Test vs. Base Test
For a ring to be wearable in real life, it must satisfy two simultaneous conditions: it must be large enough to slide over the knuckle, and small enough to sit snugly at the base. Many people have knuckles significantly larger than their finger base (this is especially common with age or arthritis). In these cases, size for comfortable knuckle passage and accept slight looseness at the base — this is preferable to a ring you cannot put on or take off.
5. How to Use a Ring Mandrel Sizer Correctly — Advanced Tips
The ring mandrel is the most accurate consumer ring sizing tool when used correctly. Here are the advanced techniques that professional jewellers use but rarely explain publicly.
Measuring Temperature and Time of Day
Finger circumference varies by up to 0.5 ring sizes depending on time of day and temperature. Fingers are largest in the evening and after physical activity, and smallest in the morning and in cold weather. For the most reliable mandrel reading, measure in the evening at room temperature — this represents the largest regular size your ring will need to accommodate.
Multiple Readings for Accuracy
Take at least three readings across different times: morning, afternoon, and evening. Note all three. If they are consistent within 0.5 sizes, use the largest reading as your ring size. If they vary by more than a full size, you may have significant daily swelling — consider the largest reading and add 0.25–0.5 to account for the variation.
Measuring Dominant vs. Non-Dominant Hand
Your dominant hand is typically 0.5 ring sizes larger than your non-dominant hand due to increased muscle use and blood flow. Always measure the hand you plan to wear the ring on. When using a mandrel, use the ring from that specific hand for sizing.
Accounting for Band Width on a Mandrel
Wider rings require larger sizes than narrower rings — a 10mm wide ring that fits comfortably needs to be 0.5–1 size larger than a 2mm wide ring that fits the same finger. This is because wider bands distribute more pressure across the finger and require more clearance at the knuckle. When sizing with a mandrel, note the width of the ring you are planning to order and adjust accordingly.
| ▶ Video: How to Use a Ring Sizer Mandrel at Home (YouTube) Watch a hands-on demonstration of how to correctly use a ring sizer stick, plastic loop gauge, and sample ring set — including how to read each type and avoid common measurement errors.Recommended YouTube searches: ‘how to use a ring mandrel sizer’ · ‘how to read a ring sizer stick’ · ‘how to measure ring size at home accurately’ |
6. Are Ring Sizers Accurate?
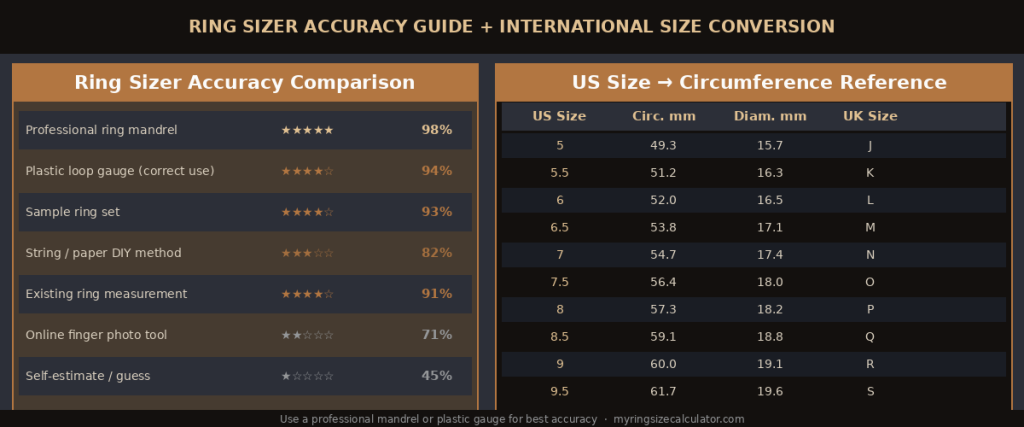
Accuracy comparison of all major ring sizer types, plus a US-to-UK ring size conversion quick reference.
Ring sizer accuracy varies significantly by type and by how correctly the tool is used. Understanding the accuracy of each type helps you choose the right tool and interpret your result with appropriate confidence.
Accuracy by Ring Sizer Type
| Ring Sizer Type | Accuracy (Correct Use) | Main Source of Error |
| Professional steel mandrel | ~98% | Reading the wrong edge; not accounting for band width |
| Plastic loop gauge (strip) | ~94% | Pulling too tight; measuring wrong time of day |
| Sample ring set (linked) | ~93% | Between-size indecision; finger swelling variation |
| String or paper DIY method | ~82% | Measurement error; paper stretch; wrong conversion |
| Existing ring comparison | ~91% | Requires ring from the same finger on same hand |
| Online photo-based tools | ~71% | Screen calibration; photo angle; distortion |
| Self-estimate or memory | ~45% | Human memory is unreliable for small measurements |
Why Ring Sizers Can Give Different Results
The same finger can produce different ring sizer readings depending on: the time of day measured (morning fingers are smaller); temperature (cold makes fingers contract); which hand is measured (dominant hand is typically larger); and the technique used. This is why professional jewellers typically take three measurements at different times and use the average of the two largest readings.
The Accuracy Floor: No Sizer Is Perfect
Even the most accurate ring sizer gives a measurement with a tolerance of approximately ±0.25 ring sizes in ideal conditions. Factors like rapid swelling and de-swelling (common in athletes or during illness), arthritis, and significant temperature variation can make any single measurement unreliable. For expensive rings, always order with a resizing option or use a professional in-store sizing before purchasing.
Community experience: Reddit: r/jewelers — Ring Sizing Tips from Professionals | GIA: Ring Size Guide
7. Common Mistakes When Reading a Ring Sizer
These are the mistakes that cause the most ring sizing errors — and how to avoid each one.
| Mistake | Why It Happens | The Fix |
| Measuring in the morning only | Fingers are smallest in AM — gives too-small reading | Measure evening too; use largest reading |
| Pulling plastic sizer too tight | Feels like ‘snug’ but is constricting | Snug = light contact, not indented skin |
| Reading top edge of mandrel | Both edges have numbers; top reads smaller | Always read bottom edge (closest to tip) |
| Ignoring band width correction | Wide bands need larger sizes on mandrel | Add +0.5 for bands over 6mm wide |
| Measuring the wrong hand | Dominant hand is ~0.5 sizes larger | Measure the hand you’ll wear the ring on |
| Measuring one finger only | Target finger may differ from ring finger | Measure the specific finger the ring will be worn on |
| Ignoring knuckle size | Knuckle vs. base can differ by 1+ sizes | Size for knuckle passage; accept base looseness |
| Cold hands when measuring | Cold contracts blood vessels = smaller reading | Warm hands before measuring; room temperature ideal |
8. Ring Size Reference Chart
Use this chart to convert between ring sizer readings, US ring sizes, and circumference in millimetres.
| US Size | Circumference (mm) | Diameter (mm) | UK Size | EU Size | Japanese |
| 4 | 46.8 | 14.9 | H | 47 | 7 |
| 4.5 | 48.0 | 15.3 | I | 48 | 8 |
| 5 | 49.3 | 15.7 | J | 49 | 10 |
| 5.5 | 50.6 | 16.1 | K | 51 | 11 |
| 6 | 52.0 | 16.5 | L | 52 | 12 |
| 6.5 | 53.3 | 17.0 | M | 53 | 13 |
| 7 | 54.7 | 17.4 | N | 55 | 14 |
| 7.5 | 56.0 | 17.8 | O | 56 | 15 |
| 8 | 57.3 | 18.2 | P | 57 | 16 |
| 8.5 | 58.7 | 18.7 | Q | 59 | 17 |
| 9 | 60.0 | 19.1 | R | 60 | 18 |
| 9.5 | 61.4 | 19.5 | S | 61 | 19 |
| 10 | 62.7 | 19.9 | T | 63 | 20 |
| 10.5 | 64.0 | 20.4 | U | 64 | 21 |
| 11 | 65.3 | 20.8 | V | 65 | 22 |
| 11.5 | 66.7 | 21.2 | W | 67 | 23 |
| 12 | 68.0 | 21.6 | X | 68 | 24 |
| 13 | 70.7 | 22.5 | Z | 71 | 26 |
| 🇸 Note on International Sizes Ring sizing systems vary between countries and do not perfectly align. These conversions are approximate. For the most accurate result, always work from the circumference in millimetres rather than converting between national size systems. A circumference measurement is universal and eliminates conversion error. |
9. When to Size Up or Down
After reading your ring sizer, you may find yourself between two sizes. Here is a clear framework for deciding which way to go.
Always Size Up When:
- You are between two sizes and the ring is narrow (under 4mm) — narrow rings feel tighter than the size suggests.
- You are between two sizes and the ring is wide (over 6mm) — wider bands require more knuckle clearance.
- Your knuckles are noticeably larger than your finger base (common with age or arthritis).
- You measure in cold conditions or in the morning — your fingers are at their smallest.
- You plan to wear the ring during exercise or in warm climates where fingers swell.
- You are ordering online without the ability to try the ring first.
Size Down When:
- The ring is very narrow (1–2mm) and a larger size would make it spin on your finger.
- Your finger base is significantly smaller than your knuckle and you want a secure, non-spinning fit.
- You measured in the evening or after exercise when fingers are at their largest.
The Golden Rule
When in doubt — always size up. A slightly loose ring is significantly more comfortable and safer than a slightly tight ring. Tight rings can cause swelling, numbness, and in emergencies (such as finger injury) can be dangerous if they cannot be removed. A ring that is 0.25–0.5 sizes too large can be worn with a ring size adjuster clip or re-sized by a jeweller. A ring that is too small may require significant metal removal that changes the ring’s integrity.
10. Frequently Asked Questions
Q: How do you read a ring sizer stick?
A: Slide your ring down the tapered mandrel from the wide end until it stops. Read the number at the ring’s lower inner edge (closest to the tip/handle). That is your ring size. If between two numbers, size up. Always read the bottom edge — not the top.
Q: How do you use a ring sizer mandrel?
A: Hold the mandrel vertically with the wide end up. Slide your ring down from the top. Let it stop naturally without forcing. Read the number at the ring’s lower edge. For wide rings (over 6mm), add 0.5 to the reading. Measure in the evening when fingers are at their typical largest size.
Q: How do you read a ring sizer strip / loop?
A: Thread the tapered end through the buckle slot to make a loop. Slide over your finger. Pull until snug — it should feel like light contact, not tight. Read the number showing through the window or alignment mark. Do not pull tight enough to leave an indent — this gives a reading that is 0.5–1 size too small.
Q: Are ring sizers accurate?
A: Yes, when used correctly. A professional ring mandrel achieves approximately 98% accuracy. Plastic loop gauges achieve approximately 94% accuracy with correct tension. The most common sources of error are: pulling the loop too tight, measuring at the wrong time of day, reading the wrong edge on a mandrel, or not accounting for ring width. Always take two or three measurements at different times for best results.
Q: What is the difference between a ring sizer and a ring mandrel?
A: A ring mandrel is one specific type of ring sizer — the tapered cone-shaped stick. The term ‘ring sizer’ is a broader category that includes ring mandrels, plastic loop gauges, sample ring sets, and strip-style finger gauges. A ring mandrel is used to size an existing ring by sliding it down the cone until it stops. A ring sizer (loop or strip type) is used to measure a living finger directly.
Q: How do you use a ring sizer on your finger?
A: If using a plastic loop/strip sizer: loop it around the base of your finger (where you plan to wear the ring). Pull snug but not tight — you should be able to slide it off with mild resistance. Read the number. If using a sample ring: try each ring until you find one that passes over the knuckle with light resistance and sits snug at the base. If using a mandrel: the mandrel measures your existing ring, not your finger directly.
Q: Should you size your ring size in the morning or evening?
A: Measure in the evening, ideally after physical activity and in a warm environment. Fingers are at their largest in the evening and after activity due to blood flow and slight swelling. If you measure only in the morning (when fingers are smallest), your ring may become uncomfortably tight by mid-afternoon. Taking measurements both morning and evening and using the larger result is the most reliable approach.
Q: How do I read a ring sizer if I don’t have a ring to measure?
A: Use a plastic loop strip sizer or sample ring set on your actual finger — these measure your finger directly without needing an existing ring. Alternatively, wrap a thin strip of paper around your finger, mark where it overlaps, and measure the length in millimetres. Compare to the circumference column in the ring size chart above to find your size.
More Ring Sizing Resources
On this site: Oura Ring Sizing Hub | Best Oura Ring | Oura Ring Buying Guide
External: GIA: Ring Size Chart & Guide | Wikipedia: Ring Size (International Standards) | Reddit: r/jewelers — Professional Ring Sizing Advice | BBC: Jewellery & Sizing Guide
| 💰 Accuracy Note Ring size measurements from any consumer tool have a tolerance of approximately ±0.25 ring sizes under ideal conditions. For expensive or irreplaceable rings, always verify your ring size in person at a jewellery store using a professional steel mandrel before ordering. Resizing options vary by ring metal and design — confirm resizing policy before purchase. |